Friday, 31 May 2013

What Is An Operating System ??


What Is An Operating System ??


An operating system (OS) is a collection of software that manages computer hardware resources and provides common services for computer programs. The operating system is a vital component of the system software in a co.mputer system. Application programs usually require an operating system to function.An operating system is the single most important software when you run a computer, it is what takes care of pretty much everything on a computer system, while the majority of computers we see happen to be using one ‘type’ of operating system performing the same functions, operating systems can be branched into several different types as well

History Of Operating System 


Early computers were built to perform a series of single tasks, like a calculator. Basic operating system features were developed in the 1950s, such as resident monitor functions that could automatically run different programs in succession to speed up processing. Operating systems did not exist in their modern and more complex forms until the early 1960s. Hardware features were added that enabled use of runtime librariesinterrupts, and parallel processing. When personal computers became popular in the 1980s, operating systems were made for them similar in concept to those used on larger computers.
In the 1940s, the earliest electronic digital systems had no operating systems. Electronic systems of this time were programmed on rows of mechanical switches or by jumper wires on plug boards. These were special-purpose systems that, for example, generated ballistics tables for the military or controlled the printing of payroll checks from data on punched paper cards. After programmable general purpose computers were invented, machine languages (consisting of strings of the binary digits 0 and 1 on punched paper tape) were introduced that sped up the programming process .
In the early 1950s, a computer could execute only one program at a time. Each user had sole use of the computer for a limited period of time and would arrive at a scheduled time with program and data on punched paper cards and/or punched tape. The program would be loaded into the machine, and the machine would be set to work until the program completed or crashed. Programs could generally be debugged via a front panel using toggle switches and panel lights


Types Of Operating Systems 


Batch Processing Operating System


In a batch processing operating system interaction between the user and processor is limited or there is no interaction at all during the execution of work. Data and programs that need to be processed are bundled and collected as a ‘batch’ and executed together.

Batch processing operating systems are ideal in situations where:
- There are large amounts of data to be processed.
- Similar data needs to be processed.
- Similar processing is involved when executing the data.

The system is capable of identifying times when the processor is idle at which time ‘batches’ maybe processed. Processing is all performed automatically without any user intervention.

Real-time Operating System


A real-time operating system processes inputs simultaneously, fast enough to affect the next input or process. Real-time systems are usually used to control complex systems that require a lot of processing like machinery and industrial systems.


Single User Operating System


A single user OS as the name suggests is designed for one user to effectively use a computer at a time.


Multi-Tasking Operating System


In this type of OS several applications maybe simultaneously loaded and used in the memory. While the processor handles only one application at a particular time it is capable of switching between the applications effectively to apparently simultaneously execute each application. This type of operating system is seen everywhere today and is the most common type of OS, the Windows operating system would be an example.


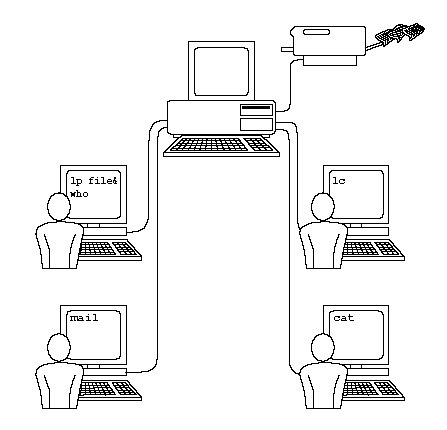
Multi-User Operating System


This type of OS allows multiple users to simultaneously use the system, while here as well, the processor splits its resources and handles one user at a time, the speed and efficiency at which it does this makes it apparent that users are simultaneously using the system, some network systems utilize this kind of operating system.


Distributed Operating System


In a distributed system, software and data maybe distributed around the system, programs and files maybe stored on different storage devices which are located in different geographical locations and maybe accessed from different computer terminals.
While we are mostly accustomed to seeing multi-tasking and multi-user operating systems, the other operating systems are usually used in companies and firms to power special systems.

Telnet Hacking

Telnet Hacking

Installing Telnet On Windows :
WINDOWS 7:
Do the Following:
Step 1:

Step :2 :  Check the Telnet Client (Recommended) and Telnet server (Optional)


Step 3 : Press “OK”
Telnet is the basic hacking tool, which every hacker must know how to use before he can even think about Hacking. It can be used to connect to remote computers and to run commands by simply typing them in it’s window.Telnet does not use the resources of the client’s computer but
uses the resources of the server to which the client has connected. Basically it is a program that you will be using to connect to your victim’s computer. It just requires that you and your victim are both connected to the internet.


How can I connect to a remote computers using telnet?

Telnet can be started by going to start -> run and typing telnet Once the Telnet windows pops up click on Connect->Remote System then in the
host name type the host i.e. the IP address of the remote computer or the website you want to connect to . Then in the Port select the port you want to connect to . You can only connect to ports which are open on the host computer.Almost always leave the TermType to vt100.We use
vt100 as it is compatible with most monitors . Then click connect and you will be connected to the remote machine in some time.
The syntax of the telnet command from DOS prompt is
“C:>telnet <hostname.com or IP> <port>
By default port is taken as 23. Scroll down and read more about ports

What is an IP Address?

Well You Probably will know the meaning of this and so i wouldn’t say anything about this. But for my new readers, IP address is the “contact number” of a computer.

What exactly is a Port

There are two kinds of ports-Physical(Hard Ware) and Virtual(Software).  You may be thinking of ports to be the slots behind your CPU to which you connect your Mouse or Keyboard or your monitor. These sockets are called physical ports . We are here interested in only virtual ports.
It is nothing physical but it is kind of a virtual pipe through which information can go in and out of the computer. A particular computer can have a large number of ports. All ports are numbered. Now at each port a particular service is running. A software which runs on a port is called service . For interchanging different kinds of information
different ports are used. A typical list shows the various ports
Ping : 7
Systat : 11
Time : 13
NetStat : 15
SSH : 22
Telnet : 23
SMTP : 25
Whois : 43
Finger : 79
HTTP : 80
POP : 110

You can connect to a remote computer at a particular port. When you are connected to that port then you can interchange information related to that particular port only. Ports can be open or closed. If a particular port of a computer is closed then you can not connect to that computer on that port. Generally most of the computers have at least 5 or 6 ports open.

Whats a Daemon?

A daemon is a program that runs at ports. You can consider it to be a software that manages the flow of information through the port . All the ports can have different daemon / services running on them

Port Scanning.

It is the first step in finding a hackable server running a daemon. Like softwares can have bugs , similarly daemons can have a hole or a vulnerability .A hacker can utilize this hole for his purpose. Say you want to hack into someone’s server , what do you do ? You need the IP address of the computer you want to connect to . This is the first basic step . Once you have the IP , you need to know which port is open so that you can connect to it . Every port may not be open so you need to find out a list of open ports which are
running a daemon.Once you have the list of open ports on the victims computer then you can connect to any one of those ports. For this purpose we have Port scanners. You just need to feed the IP address into the port scanner and it will give you the list of all the open ports of that IP.Some port scanners,along with the list of open ports also gives the service running on each port and its vulnerabilities.
Once you have got the list of open ports then connect to each of them one by one and see what daemon or service they are running.
                 But one thing you need to be careful about before port scanning is that most port scanners are very easily detected and can easily be traced and you have no excuse if you are caught doing a port scan. It a sure sign of Hacker Activity and if the host is running the right kind of Sniffer software maybe Etherpeek then the Port scan can be easily detected and the IP of the user logged . Once your IP is logged then you can be easily traced through the internet service provider, so be careful with port scanning.
Below are the list of Telnet Commands :
Close: close current connection
Display: display operating parameters
Open:  connect to a site
Quit: exit telnet
SET: 
set options (type ‘set ?’ for a list)
NTLMTurn ON NTLM Authentication.
LOCAL_ECHOTurn ON LOCAL_ECHO.
TERM x(where x is ANSI, VT100, VT52, or VTNT)
CRLFSend both CR and LF
Status: print status information
Unset:
unset options (type ‘unset ?’ for a list)


NTLMTurn OFF NTLM Authentication
.LOCAL_ECHOTurn OFF LOCAL_ECHO
.CRLFSend only CR (no LF is sent)
?/help: print help information

Input Validation Attacks

Input Validation Attacks are where an attacker intentionally sends unusual input in the hopes of confusing the application.
The most common input validation attacks are as follows-

1) Buffer Overflow :- Buffer overflow attacks are enabled due to sloppy programming or mismanagement of memory by the application developers. Buffer overflow may be classified into stack overflows, format string overflows, heap overflows and integer overflows. It may possible that an overflow may exist in language’s (php, java, etc.) built-in functions.
To execute a buffer overflow attack, you merely dump as much data as possible into an input field. The attack is said to be successful when it returns an application error. Perl is well suited for conducting this type of attack.
Here’s the buffer test, calling on Perl from the command line:
$ echo –e “GET /login.php?user=\
> `perl –e ‘print “a” x 500’`\nHTTP/1.0\n\n” | \
nc –vv website 80
This sends a string of 500 “a” characters for the user value to the login.php file.
Buffer overflow can be tested by sending repeated requests to the application and recording the server’s response.

2) Canonicalization :- These attacks target pages that use template files or otherwise reference alternate files on the web server. The basic form of this attack is to move outside of the web document root in order to access system files, i.e., “../../../../../../../../../boot.ini”. This type of functionality is evident from the URL and is not limited to any one programming language or web server. If the application does not limit the types of files that it is supposed to view, then files outside of the web document root are targeted, something like following-
/menu.asp?dimlDisplayer=menu.asp
/webacc?User.asp=login.htt
/SWEditServlet?station_path=Z&publication_id=2043&template=login.tem
/Getfile.asp?/scripts/Client/login.js
/includes/printable.asp?Link=customers/overview.htm

3) Cross-site Scripting (XSS) :- Cross-site scripting attacks place malicious code, usually JavaScript, in locations where other users see it. Target fields in forms can be addresses, bulletin board comments, etc.
We have found that error pages are often subject to XSS attacks. For example, the URL for a normal application error looks like this:
http://website/inc/errors.asp?Error=Invalid%20password
This displays a custom access denied page that says, “Invalid password”. Seeing a string
on the URL reflected in the page contents is a great indicator of an XSS vulnerability. The attack would be created as:
http://website/inc/errors.asp?Error=<script%20src=…
That is, place the script tags on the URL.

4) SQL Injection :- This kind of attack occurs when an attacker uses specially crafted SQL queries as an input, which can open up a database. Online forms such as login prompts, search enquiries, guest books, feedback forms, etc. are specially targeted.
The easiest test for the presence of a SQL injection attack is to append “or+1=1” to the URL and inspect the data returned by the server.
example:- http://www.domain.com/index.asp?querystring=sports’ or 1=1—

Packet Sniffing With WIRESHARK

Packet Sniffing With WIRESHARK

                     http://i.imgur.com/IXcgJ.png
I will be going over the general terminology that we will need to know about packet sniffing (such as “what is a packet?”), and why someone would want to sniff their network (for both black hat and white hat purposes). This thread will encompass the fundamentals of packet sniffing with Wireshark, and more complex concepts as well. For now, though, I will cover the basic terms you should know prior to continuing on with this thread. I will also assume that you know the core concepts and terminology of networking as well.


INTRODUCTION:

Packet: A packet is, at its core, is simply a certain amount of data sent over a network. To put it into perspective, whenever you receive data from the internet, it is going to your PC (or whatever ED you are using at the time) in the form of a multitude of little packets.

Promiscuous Mode: This is an option for most packet sniffers that allows you to put your NIC (Network Interface Card; the physical component that establishes the connection between the PC and network cable) in a mode that allows you to modify network traffic and inject different protocols. An example of this would be as follows: Lets say I was using a packet sniffer in Promiscuous Mode and wanted to modify the protocols for Google.com. Instead of wanting the Google banner as the actual banner, I could instead change it to, lets say, Hack Forum’s banner.

Monitor Mode: This is the mode for your NIC that lets you simply view what’s going on between your machine and the network it is connected to. You do not need Administrative rights to do this.

Frames: ‘Frames’ in the packet sniffing world simply means “a series of data”, which, include, ‘packets’.


Now that you’ve got the basic terminology down that you will need to begin your journey of packet sniffing, now you must be asking yourself: what exactly is ‘packet sniffing’, and why would I want to do it? Now, in reference to the definition of a ‘packet’, a packet is but a certain amount of data sent over a network. Therefore, packet-switching (the act of sending and receiving packets) is used frequently to connect to websites and whatnot. Packets, as previously stated, also contain data within them. This data (while using Wireshark or TCPDump) can be listened to (or, in other words, ‘viewed’ if you are using Monitor Mode on your packet sniffer; in Promiscuous Mode you can actually tamper with the data, but that is for another day of chat) and seen as for what your network is truly doing. Basically, it tells you “what’s going on with my network?”. Some people in IT may need to know why something isn’t sending properly, or who is on my network. All of these inquiries can be answer properly with packet sniffing. However, it can be used for malicious purposes as well, such as stealing passwords and such. Now, there are 7 layers you should familiarize yourself with when you are packet sniffing with Wireshark.

This image (known as the OSI Model) shows us the layers on how a network communicates. As shown, it divides the means of connection into 7 distinct layers. The further explaining of the layers are explained below.
  • Layer 7: This is the transport layer in which mainly consists of HTTP connection to a website. This is what your web browser (application) shows as the result of successfully receiving the packets. This is what you will be seeing on your monitor when the packets have been successfully received and built (also referred to as the ‘end product’). This isn’t necessarily the part that is interesting about packet sniffing. Layer 4 and below is where packet sniffing becomes extremely fun.
  • Layer 6: This is the layer that typically involves an SSL (Secure Sockets Layer ) protocol. It is used by many websites to send data securely.
  • Layer 5: All this layer describes is the creation of the session layer.
  • Layer 4: Now, here is where packet sniffing starts to shine. Layer 4 has to do with the transporting of packets. You know, what protocol am I using? Is it TCP or UDP? If I were on YouTube, for example, it would appear as ‘UDP’. But, if I were to go to Google, it would be ‘TCP’.
  • Layer 3: This is the layer where the actual packets reside. This is where you would be getting into how the packets get put together, and the source and destination address. This layer will show you the little bits of data (packets) that will be going through your wire (or, if you’re on WiFi, through the atmosphere) and reassemble on the other end, hopefully giving you the desired results (correct webpage). If, however, these packets get sent out of order, you would get a corrupted page. This isn’t that common among webpages, but with downloads, this is how you get a corrupted file.
  • Layer 2 & 1: This is the actual physical layer of your network and the components that it needs to communicate properly. This is all about the copper in the ground and your ED (also Ethernet cables and such. You get the idea.). Layer 1 focuses on the actual waves and particles behind communication (for example: satellite).
The layers listed above will give you a better perception when you’re packet sniffing. Getting to know the above layers will help you dissect the actual information you will log with Wireshark. Now that we’ve got that out of the way, lets move on to actually using Wireshark, and putting it into perspective. The first thing you want to do once you have downloaded Wireshark is, simply, set it up. Go through the Install Wizard’s prompts and choose to ‘run’ Wireshark. You can also use the desktop icon if you chose to add one to your desktop. Now assuming that you executed the program, a window should open up and it will look like the one below :


From here, you now have access to a handy GUI interface to which you can now start capturing data with. You’re going to want to click on
your NIC below the ‘Start’ button and click ‘Start’. From here, you should have a window similar to this:


As you can see, on the top section of Wireshark there will be your packets that you are currently logging (this depends on the webpages you currently have open in your web browser. If you wanted, you could open up a new tab and go on over to Hackforums.net and switch back to Wireshark to see the packets rolling in).

As you can see from the new pane in Wireshark, the first column on the section (from left to right) reads ‘No.’ (which stands for ‘number’). This will tell you want number packet it is since you started capturing (or sniffing). On the next column to the right, it reads ‘Time’, which basically means how long it took since you started capturing for the packet to be received. The third column shows the source IP address (the packet’s origin), and the fourth column shows the destination IP address. And, the fifth column shows the protocol, whether it be Domain Name Server or Transmission Control Protocol, or HyperText Transfer Protocl (to be very brief about HTTP, you do not want to login in to websites while you’re on HTTP. The protocol transfers your passwords non-hashed and in plain text. This means that it is easy for someone who is sniffing your network to get your login). And, finally, the ‘Length’ and ‘Info’ column show the more advanced information of the packet.

Now, depending on what you want to do, you can choose to filter the types of packets via the ‘Filter’ bar at the top of the window. Lets say that you wanted to view only HTTP requests. You would then go to the Filter bar and type “http.request”. This command would just show the packets of interest. Alright, remember when I said when you were streaming that you could go and visit a website of your choice (I recommended Hack Forums) and see the packets be logged? Well, browse through the log and look to the right column for something with ‘hackforums’ in the URL. Once you find it, right click on it and hit “Follow TCP Stream”. Wireshark should come up with a new window with red text showing what data you sent, and in blue what data you received. Again, this shows all of the raw data within the packet, which I would get into if this weren’t a fundamental guide to Wireshark.